How To Draw Hello Kitty: Your Easy Step-by-Step Guide Today
Are you ready to discover the pure happiness of drawing one of the most cherished figures in Japanese pop culture? So many people adore Hello Kitty, and for good reason; she is, arguably, the very essence of Japanese cuteness. This guide will help you create a sweet image of this well-loved Sanrio character, making the whole process enjoyable and quite simple, actually. You might be surprised at just how quickly you can bring her to life on paper.
This session is all about creating a charming picture of this iconic figure. We are going to learn how to draw Hello Kitty in a very straightforward and clear way, with lots of helpful advice and examples along the way. You will get to know the method step by step, and you will see how simple forms can come together to make something really fun. It's truly a rewarding experience, you know, to see your favorite character appear right before your eyes.
To begin your artistic journey, you only need a few basic things. Just grab a pencil, a good eraser, and some paper, and you are pretty much set. This tutorial will teach you how to draw your very own Hello Kitty, using simple ways to create shapes that are quite basic. You will also get to know a little bit about the story, the way she looks, and the special parts of this famous Sanrio character, which will help you make your own lovely pictures. It's a wonderful way to spend some time, honestly.
Table of Contents
- Introduction
- Why Hello Kitty is So Much Fun to Draw
- Getting Ready: Your Drawing Supplies
- How to Draw Hello Kitty Step-by-Step: The Main Process
- Tips for Making Your Hello Kitty Drawing Even Better
- Frequently Asked Questions About Drawing Hello Kitty
- Your Artistic Adventure Continues
Why Hello Kitty is So Much Fun to Draw
Hello Kitty, whose actual name is Kitty White, is a fictional character who has captured hearts around the globe for many, many years. She is, in a way, considered the very best example of Japanese cuteness, and her appeal seems to just grow stronger over time. Her design is quite simple, which is why she is so approachable for artists of all ages, you know, whether you are just starting out or have drawn for a while. Her round head and straightforward features make her a really enjoyable character to put on paper.
Drawing Hello Kitty is perfect for those who are new to art or even young artists because her shapes are so basic. You will find that she is drawn using, well, mostly simple curves and circles, which makes the whole drawing process feel manageable and quite pleasant. This means you can focus on getting her sweet expression just right without getting tangled up in too many difficult details. It's a very forgiving process, honestly, and that is part of her charm.
The fact that she is so recognizable also adds to the fun. When you sketch this iconic character, you are not just drawing lines; you are, in fact, bringing a piece of beloved pop culture to life. It is quite a satisfying feeling, seeing her famous face appear under your hand. This drawing guide, in some respects, will help you create your favorite character in practically no time at all, whether you are a complete beginner or someone with a bit more drawing skill. It is truly for everyone.
Getting Ready: Your Drawing Supplies
Before we begin to sketch, let's make sure you have everything you need. The good news is that you do not need any fancy or expensive art tools for this project. This is, you know, one of the best parts about drawing Hello Kitty; she is accessible to everyone. All you really need is a pencil, which will be your main tool for creating lines and shapes. A good pencil, perhaps a standard HB or 2B, works just fine for getting those initial ideas down.
Next up, you will definitely want an eraser. This is, quite frankly, a crucial item because drawing is all about making adjustments and refining your lines. You will be sketching light guidelines first, and then you will need to clean up any extra marks or overlapping lines as you go. An eraser helps you make your drawing look neat and polished, so do not skip it. It's a very important part of the process, really.
And of course, you will need some paper. Any kind of drawing paper or even just plain printer paper will do the trick. The most important thing is that you have a smooth surface to work on, allowing your pencil to glide easily. You might also want to have some coloring tools nearby, like colored pencils, crayons, or markers, if you plan to add some vibrant hues to your finished Hello Kitty drawing. Having them ready just makes the whole experience more complete, you know.
How to Draw Hello Kitty Step-by-Step: The Main Process
Welcome to this Hello Kitty drawing lesson! In this session, we will, as a matter of fact, create a charming picture of this beloved Sanrio character. You will learn the process step by step, focusing on basic shapes and outlines first. This approach will make the drawing manageable and truly enjoyable for everyone, regardless of their past drawing experience. You will see how simple forms come together to create something truly fun and recognizable, which is pretty neat.
We are going to take things slowly, building up the drawing layer by layer. This method helps to avoid feeling overwhelmed and allows you to focus on one part at a time. Remember, the goal here is to have a good time and create something cute, not to make a perfect masterpiece on your first try. It is, after all, about the joy of the creative process. So, let's get started with the very first step, which is, quite typically, one of the most recognizable parts of Hello Kitty.
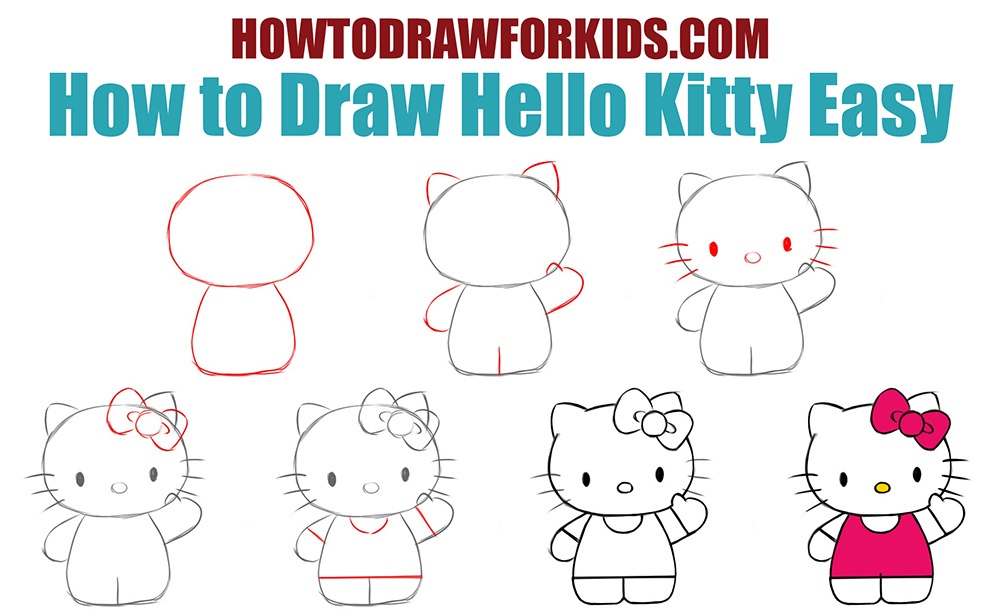
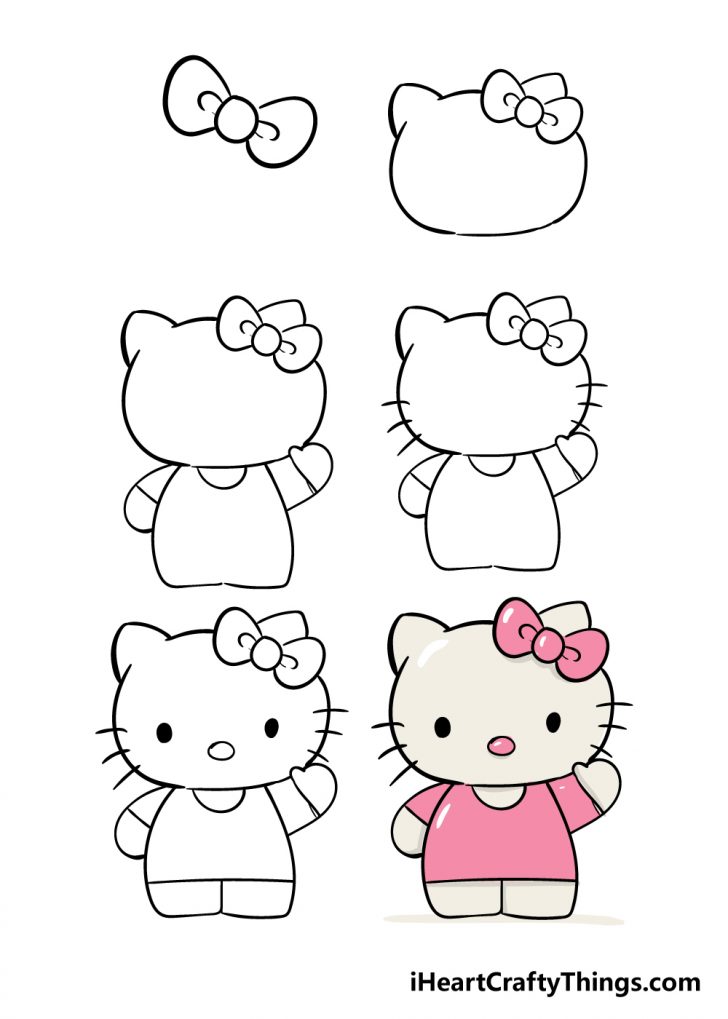
Step 1: Start with Hello Kitty's Iconic Bow
Cute Hello Kitty drawing begins right here! For this method on how to draw Hello Kitty, you will start by drawing Hello Kitty's bow. This famous accessory is always found in the upper center area of her head, so that is where you will place it. It's a really good starting point, as it helps to set the scale for the rest of her head. You want to make sure it is not too big or too small, just right for her sweet little face.
First, draw a small circle in the middle of where you want the bow to be. This circle will serve as the knot of the bow, and it helps to anchor the two loops that will come next. It does not have to be absolutely perfect, just a nice, neat little round shape. This initial circle is, in a way, the central piece that holds the whole bow together, so take a moment to get it positioned well.
Next, add two loops on each side of this small circle to form the bow's shape. Think of them as soft, rounded shapes that extend outwards from the central circle and then curve back in towards it. These loops should be more or less symmetrical, meaning they are roughly the same size and shape on both sides. You can also, for added flair, draw tiny folds inside the loops for a bit more detail, giving the bow a more realistic, fabric-like appearance. This really makes it pop, you know.
Step 2: Shaping Her Sweet Head
Once you have her lovely bow in place, the next big step in learning how to draw Hello Kitty is to shape her head. Hello Kitty is, you know, famous for her very round head, which is one of her most charming features. You will want to draw a large, gentle oval or a nearly perfect circle just below her bow. This shape will be the main part of her head, so make sure it is quite spacious and has a nice, smooth curve.
Position this head shape so that the bow appears to be resting right on top of it, or slightly overlapping the very top edge. It is important to get the size right here; the head should be much larger than the bow, giving her that characteristic cute proportion. Do not press your pencil down too hard at this stage, as you might need to adjust the shape a little bit. We are just sketching the basic outline, after all, and light lines are easier to change.
Think of this head shape as the foundation for everything else. It is where her features will go, and it will connect to her body. So, take your time to get a pleasing, round shape. You might draw it a few times until you are happy with how it looks. This is, honestly, a very common part of the drawing process, making small adjustments as you go. It is all about finding that sweet spot for her adorable appearance.
Step 3: Adding Her Simple Features
With Hello Kitty's head drawn, it is time to add her very simple, yet incredibly expressive, features. This is where her personality really starts to shine through, you know. Hello Kitty is known for her minimal facial details, which makes her quite easy to draw and also very recognizable. We are going to add her eyes, nose, and whiskers now, which is, basically, all she needs to look like herself.
For her eyes, draw two small, oval shapes, or perhaps just simple dots, placed on either side of the center of her face. They should be positioned slightly above the middle of her head. Make sure they are more or less symmetrical and spaced evenly apart. They are usually just plain black, giving her a very direct and innocent gaze. There is no need for pupils or complex details, which is quite nice, really, for beginners.
Her nose is a small, yellow oval, or sometimes just a simple yellow circle, placed right in the center of her face, slightly below and between her eyes. It is a tiny detail, but it adds so much to her overall sweet look. Finally, Hello Kitty has three whiskers on each side of her face. These are simple, curved lines that extend outwards from her cheeks. They should be relatively thin and graceful, adding a bit of playful charm to her expression. You can make them curve slightly upwards or downwards, depending on the look you prefer; it is, in a way, up to your own artistic choice.
Step 4: Drawing Her Body and Outfit
Now that Hello Kitty's head and face are complete, we will move on to drawing her body and her signature outfit. This part is, thankfully, also quite simple, as her body is usually depicted with very basic shapes. You will want to draw a gentle, rounded shape for her torso directly below her head. Think of it as a soft rectangle with curved corners, or perhaps a slightly squashed oval, depending on her pose. This shape should connect smoothly to the bottom of her head, giving her a seamless appearance.
Hello Kitty often wears a simple dress or a pair of overalls, and these are easy to sketch. For a dress, you might draw two lines extending downwards from her torso, flaring out slightly to form the skirt. The bottom of the skirt can be a gentle curve. If you are drawing her in overalls, you would sketch two straps coming up from her shoulders to meet her body, and then a rectangular shape for the main part of the overalls. Remember, these are just basic shapes to suggest clothing, so do not overthink the details.
Her arms and legs are also quite simple. Her arms are typically just two rounded shapes extending from her sides, often with a small hand or mitten-like shape at the end. Her legs are similar, just two rounded forms extending downwards from her body or outfit, ending in simple feet. Keep all these body parts relatively short and stubby, as that is part of her cute, child-like appearance. It is, you know, all about those sweet, rounded proportions that make her so endearing.
Step 5: Final Touches and Erasing Lines
You are almost there! The main shapes of Hello Kitty are now on your paper, and this is where you refine your drawing and make it look clean and polished. This step is, frankly, crucial for a neat final picture. Go over all your initial sketch lines with a slightly firmer hand or a darker pencil to make the lines you want to keep stand out clearly. This helps to define the edges of Hello Kitty's head, bow, features, and body, giving her a crisp outline.
After you have darkened your chosen lines, it is time for the eraser to do its important work. Erasing overlapping lines is, quite honestly, crucial for a clean drawing. You will have a lot of light sketch lines and perhaps some lines that overlap where shapes meet. Carefully erase all these unnecessary lines, leaving only the clear, defined outline of Hello Kitty. Take your time with this, as a clean erase job makes a huge difference in the final appearance of your drawing. It is, in a way, like tidying up your artwork.
Once the extra lines are gone, step back and look at your drawing. Are there any areas that need a little touch-up? Perhaps a line could be smoother, or a curve could be more rounded. This is your chance to make those small adjustments. You might also want to add any last tiny details, like those folds in her bow if you did not add them before, or perhaps a small texture to her outfit. This really makes the drawing feel complete, you know, and ready for color if you choose to add it.
Tips for Making Your Hello Kitty Drawing Even Better
How to Draw Hello Kitty Easy | How to Draw for Kids
Hello Kitty Drawing - How To Draw Hello Kitty Step By Step
How To Draw Hello Kitty Characters

