Making Homemade Candy Apples: Your Sweet And Crunchy Guide
There's just something about a candy apple that brings a smile, isn't there? That glossy, vibrant red shell wrapped around a crisp, juicy fruit. It's a treat that, you know, really captures the spirit of fall, or maybe even those fun times at a fair. For many, it's like a little piece of edible art, too it's almost. The thought of biting into that hard, sugary coating and then hitting the tart apple underneath is, well, pretty delightful.
If you've ever wished you could bring that wonderful carnival feeling right into your own kitchen, you're in luck. Making candy apples at home is, in a way, much simpler than you might think. We're talking about a classic dessert that, honestly, is a breeze to create with just a few basic things you probably already have in your pantry.
This guide will walk you through everything you need to know to whip up your own batch of perfect, crunchy candy apples. We'll cover the essential ingredients, the simple steps, and even some clever tips to make sure your apples turn out shiny, not sticky or waxy, and absolutely delicious. So, are you ready to try your hand at this sweet, nostalgic creation?
Table of Contents
- Why Make Candy Apples at Home?
- The Essentials: What You'll Need
- Step-by-Step Guide to Your Candy Apples
- Tips and Tricks for Perfect Candy Apples
- Common Questions About Candy Apples
- Enjoying Your Homemade Delights
Why Make Candy Apples at Home?
Making candy apples yourself is, well, incredibly satisfying. You get to control every part of the process, from picking the exact apples you like to getting that candy coating just right. It's a fun project for, say, a fall afternoon, especially if you've just been apple picking, or perhaps you're planning a Halloween get-together. The aroma of the sugar cooking, the bright colors, and then that first satisfying crunch—it's all part of the experience.
Plus, homemade candy apples often taste, you know, so much fresher than store-bought ones. You can ensure they have that lovely crispness inside and that truly hard, shiny coating outside. It's also a fantastic way to create something special for a birthday party or just to enjoy as a sweet treat with family. Seriously, it's an activity that brings a bit of joy to the kitchen.
The Essentials: What You'll Need
To get started on your candy apple adventure, you'll need a few key things. It's really about combining simple ingredients in the right way to create that iconic treat. So, let's look at what you'll want to gather.
Picking the Perfect Apple
The apple itself is, obviously, the star of this show. While you can candy almost any apple, some varieties work better than others for that classic sweet-tart balance. Granny Smith apples are a popular choice because their tartness really cuts through the sweetness of the candy coating, which is, you know, a pretty good combination.
However, you could also use Gala or Honeycrisp apples if you prefer a slightly sweeter base. The main thing is to pick apples that are firm and crisp, without any soft spots or bruises. You want them to stand up well to the hot candy coating, basically.
Key Ingredients for the Candy Coating
The candy coating itself is, honestly, quite simple. You'll need just a few basic pantry items to create that beautiful, hard shell. My text suggests using sugar, corn syrup, water, and food coloring. Some recipes, like Sabrina's, might even incorporate cinnamon candies for a specific flavor and color, which is kind of interesting.
- Granulated Sugar: This is the main component, giving the coating its sweetness and structure.
- Corn Syrup: This helps prevent the sugar from crystallizing, making the coating smooth and shiny. It's pretty important for that glossy look.
- Water: Just enough to dissolve the sugar and corn syrup.
- Red Food Coloring: For that classic, vibrant red look. You can use gel or liquid food coloring; gel often gives a more intense color with less product, you know.
- Optional Flavorings: A touch of cinnamon extract or even crushed cinnamon candies can add a nice warmth and a bit of a kick, too it's almost.
Helpful Tools and Equipment
Having the right tools makes the process much smoother and safer. You don't need anything too fancy, but a few specific items are, well, really helpful. My text mentions a candy thermometer, which is absolutely essential for getting the coating to the right temperature for that perfect crunch.
- Heavy-Bottomed Saucepan: A sturdy pan helps distribute heat evenly and prevents the sugar from burning.
- Candy Thermometer: This is, like, non-negotiable. It ensures your candy reaches the exact temperature needed for a hard, crunchy coating, avoiding sticky or waxy results.
- Wooden Sticks or Dowels: For holding the apples. Popsicle sticks or even sturdy skewers work well.
- Parchment Paper or Silicone Mat: For cooling the dipped apples without sticking.
- Pastry Brush: Useful for brushing down sugar crystals from the sides of the pan.
- Heat-Resistant Spatula or Spoon: For stirring the candy mixture.
Step-by-Step Guide to Your Candy Apples
Now for the fun part: making the candy apples! This process is, you know, pretty straightforward, but paying attention to a few details will ensure your success. We'll break it down into easy, manageable steps.
Preparing Your Apples
Proper apple preparation is, like, a really important first step. My text suggests that learning how to avoid sticky and waxy apples starts right here. Apples naturally have a waxy coating, and if you don't remove it, the candy won't stick properly, which is, well, kind of a bummer.
- Wash and Dry Thoroughly: Wash your apples very well under warm water. You might even want to scrub them gently to remove any waxy coating or residues.
- Remove Stems: Carefully pull out the stems.
- Insert Sticks: Push a wooden stick or dowel firmly into the core of each apple, going about halfway through. You want them to be stable for dipping.
- Chill (Optional but Recommended): Some people find chilling the prepared apples for about 15-30 minutes helps the candy set faster and prevents it from sliding off, so that's a good tip.
Crafting the Candy Coating
This is where the magic happens, transforming simple ingredients into that gorgeous, shiny coating. The key here is, honestly, temperature control. My text emphasizes using a candy thermometer for a crunchy, shiny, and delicious treat.
- Combine Ingredients: In your heavy-bottomed saucepan, combine the sugar, corn syrup, and water. If you're using crushed cinnamon candies, add them now too.
- Heat Gently: Place the pan over medium heat. Stir constantly until the sugar dissolves completely. This is, like, really important to avoid a grainy coating.
- Stop Stirring and Increase Heat: Once the sugar is dissolved, stop stirring. Increase the heat to medium-high. You can, however, use a wet pastry brush to gently wash down any sugar crystals that form on the sides of the pan. This prevents crystallization.
- Insert Thermometer: Attach your candy thermometer to the side of the pan, making sure the tip doesn't touch the bottom.
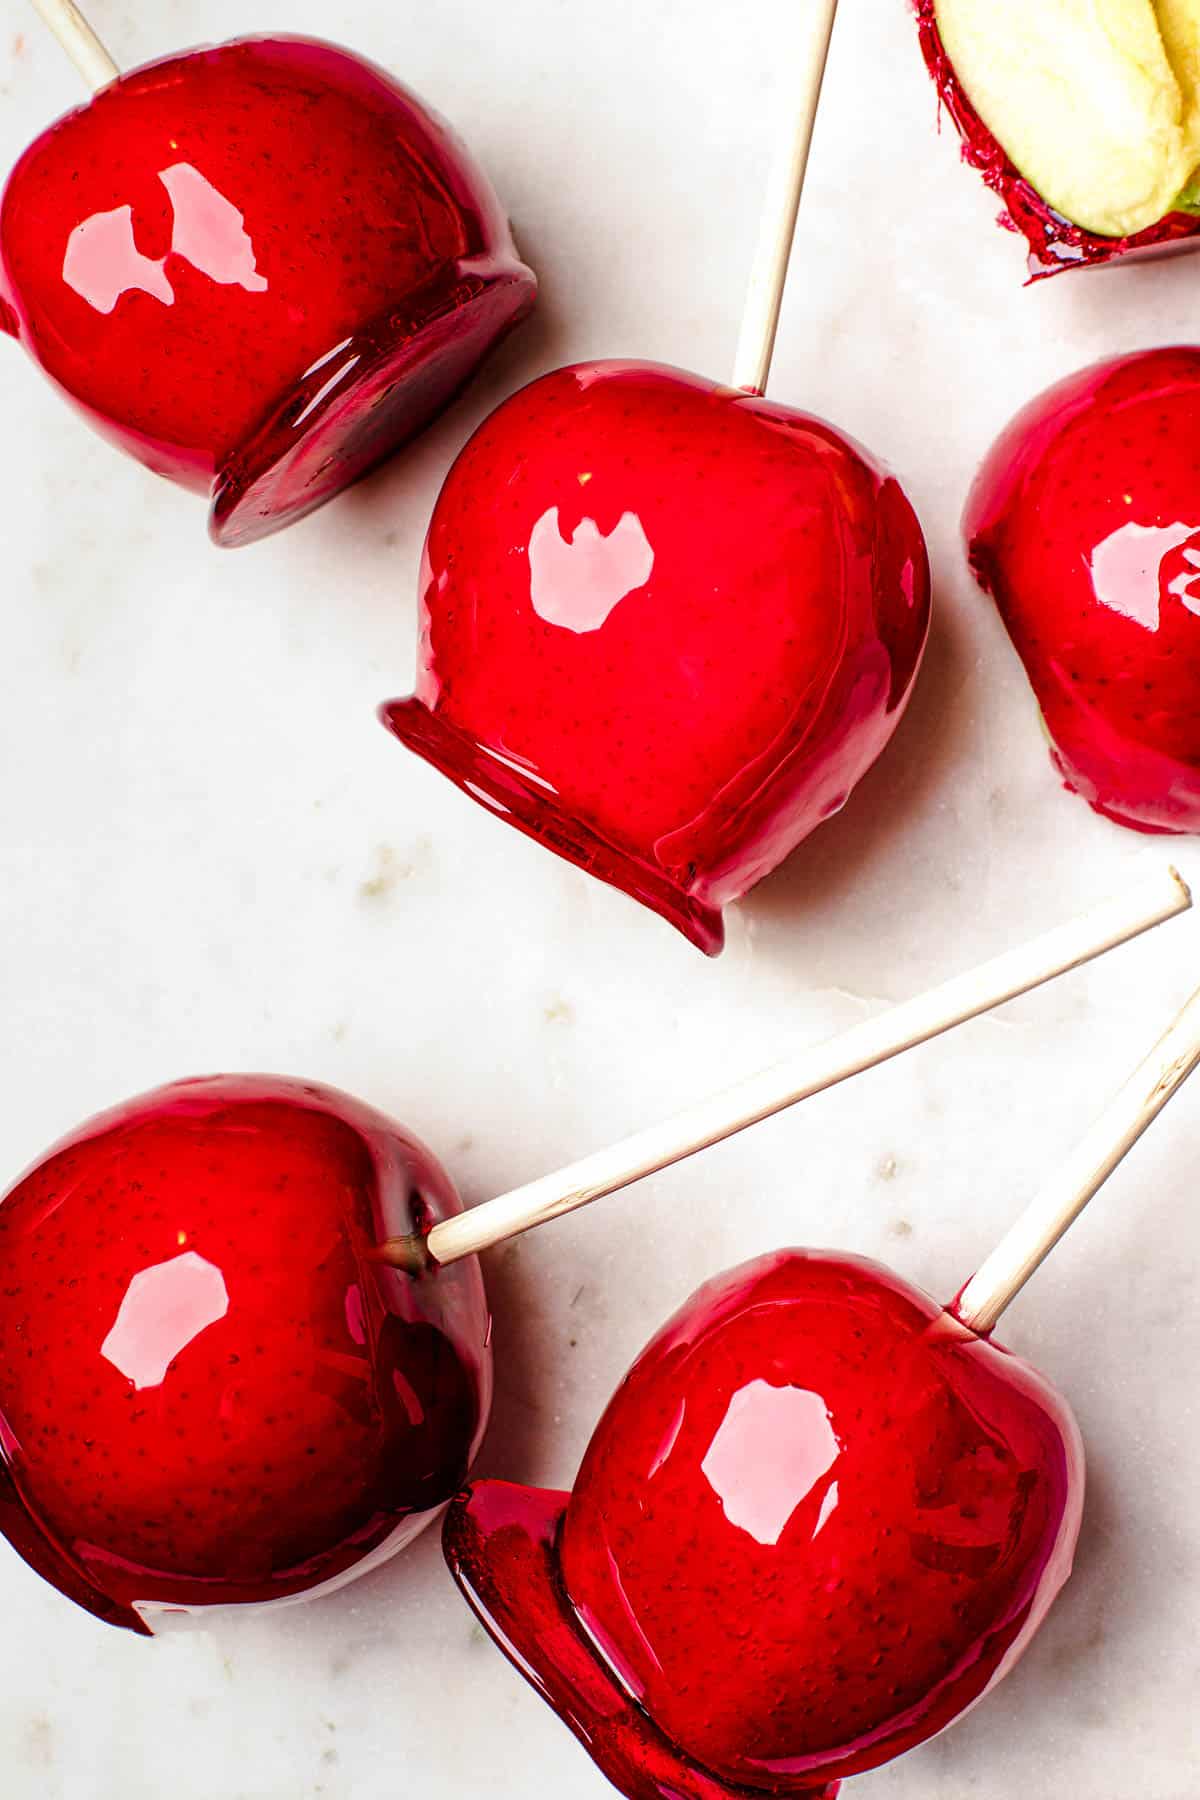
- Cook to Temperature: Let the mixture boil without stirring until it reaches 300-310°F (149-154°C). This is the "hard crack" stage, which ensures a crunchy coating. My text specifically mentions a hard crunchy coating.
- Add Food Coloring: Once the mixture reaches the desired temperature, immediately remove the pan from the heat. Stir in your red food coloring quickly until the color is even and vibrant. Be careful, as the mixture will be very hot, obviously.
Dipping and Cooling Your Treats
The final steps bring your candy apples to life! This part requires a bit of speed and care, as the candy will start to set as it cools. My text talks about creating a sweet and crunchy fall treat with easy steps.
- Dip Apples: Working quickly, tilt the saucepan slightly to gather the candy mixture. Carefully dip each apple into the hot candy, rotating it to fully coat the apple. Let any excess drip off back into the pan. You want a nice, even, thin layer.
- Cool Properly: Place each dipped apple onto a sheet of parchment paper or a silicone mat. Make sure they don't touch each other.
- Allow to Set: Let the candy apples cool completely at room temperature. This can take about 30 minutes to an hour, or even a bit longer, depending on your kitchen's temperature. The candy will harden as it cools, giving you that satisfying crunch.
Tips and Tricks for Perfect Candy Apples
Even with a simple recipe, a few insider tips can really, you know, make all the difference. My text mentions following tips and tricks to avoid sticky and waxy apples, and that's exactly what we'll focus on here.
Avoiding Stickiness and Waxiness
Nobody wants a sticky or waxy candy apple, right? That's, like, the opposite of what we're going for. The key is in the preparation and the temperature of your candy.
- Clean Apples are Crucial: As mentioned, thoroughly washing and drying your apples is paramount. The natural waxy coating on apples will repel the candy, causing it to slide off or create a sticky mess. You can, perhaps, even dip them quickly in boiling water for a few seconds, then dry them very well to remove the wax.
- Temperature is Everything: If your candy doesn't reach the hard crack stage (300-310°F), it will remain soft and sticky. If it goes too high, it might burn or become brittle. A candy thermometer is, you know, your best friend here.
- Work Quickly: Once the candy is ready, it will start to cool and thicken. Dip your apples swiftly to get an even coating before the candy becomes too thick to work with.
Getting That Hard, Crunchy Finish
That satisfying crunch is, for many, the hallmark of a great candy apple. It's what sets them apart from, say, caramel apples. My text highlights that unlike caramel apples, candy apples have a delicious crunch when you bite into them.
- Precise Temperature: Again, hitting that 300-310°F mark is vital. This temperature ensures the sugar molecules form a hard, glass-like structure when cooled.
- Humidity Matters: High humidity can make candy apples sticky and prevent them from fully hardening. Try to make them on a dry day if possible. If it's humid, you might need to cook the candy a degree or two higher, which is, well, a little adjustment.
- Thin Coating: A thinner layer of candy will harden more effectively and provide a better crunch. Don't try to pile on too much. My text mentions a thin layer of homemade sugar candy, so that's a good reminder.
Playing with Color and Flavor
While classic red is, like, iconic, you can totally get creative with your candy apples. My text mentions how to make candy apples any color, and that's pretty cool.
- Different Food Colors: Use gel food coloring to achieve vibrant shades of green, blue, purple, or even black for a spooky Halloween look. Just swap out the red for your chosen color.
- Flavor Extracts: Add a few drops of food-grade flavor extracts, like cherry, apple, or even a hint of peppermint, along with the food coloring. Just make sure they are oil-based or very concentrated, as too much liquid can affect the candy's consistency.
- Cinnamon Candies: As my text points out, some recipes use cinnamon candies cooked down with the sugar for a distinct cinnamon flavor and a naturally red hue. This is, like, a really fun variation.
Common Questions About Candy Apples
People often have a few questions when they're making candy apples for the first time. Here are some of the most common ones, with some helpful answers, obviously.
Q: What are the best apples for candied apples?
A: Granny Smith apples are, you know, a top choice because their tartness balances the sweet candy coating really well. However, Gala, Honeycrisp, or even Fuji apples can also work wonderfully. The most important thing is to pick firm, crisp apples that hold their shape.
Q: Why are my candy apples sticky or waxy?
A: Stickiness usually happens if the candy didn't reach the correct "hard crack" temperature (300-310°F). A candy thermometer is, like, essential for this. Waxiness often means the natural waxy coating on the apple wasn't fully removed before dipping. Make sure to wash and dry your apples very thoroughly, maybe even scrubbing them a bit, to be honest.
Q: How long do homemade candy apples last?
A: For the best quality, candy apples are, well, best enjoyed within a day or two of making them. Store them at room temperature in a cool, dry place. Refrigeration can cause the candy to become sticky due to condensation, which is, you know, something to avoid.
Enjoying Your Homemade Delights
There's nothing quite like biting into a homemade candy apple, is there? That satisfying crack of the candy, followed by the crisp, juicy apple inside. It’s a treat that, honestly, brings a bit of nostalgia right into your hands. My text describes them as a classic fall treat with a shiny bright color, hard candy coating, and a sweet or tart crisp apple underneath, and that's pretty accurate.
Whether you're making them after a fun day of apple picking, for a festive Halloween party, or just because you feel like being a kid again, these candy apples are, you know, a perfect choice. They look impressive, but as you've seen, they're actually pretty easy to whip up. So, go ahead, enjoy your delicious, crunchy creations!
For more great dessert ideas, learn more about our sweet treats on our site. You can also find other fun fall recipes here to round out your seasonal menu. And for general food safety tips when cooking with sugar, you might want to check out resources from a trusted source like the FDA, which is, like, always a good idea.
This timeless dessert is, really, a joy to make and share. Happy candying!
Today is October 26, 2023, and these candy apples are, well, just perfect for this time of year.

Super EASY Candy Apple Recipe // Video - The Suburban Soapbox

Delicious & crunchy traditional red candy apples from Miss Birdsong's
Homemade Candy Apples | Easy Weeknight Recipes

