How To Schedule A Text On IPhone: Your Guide To Timed Messages
Do you ever wish you could send a message at a precise moment, even if you are busy or asleep? Maybe you want to send weekly reminders of chores to your family or automatically let your spouse know when you are heading home. It is a common wish, and for good reason. Sending a text at just the right time can make a big difference, helping you stay connected and organized without needing to remember every little thing.
For quite some time, getting your iPhone to send a message later involved a bit of a workaround. People often used the Shortcuts app, which is a very handy tool for automating many tasks on your device. However, as a matter of fact, things have changed. With the arrival of iOS 18, Apple has made it much simpler to schedule a message directly within the Messages app itself. This means you have more ways to make sure your words reach their intended person at the perfect moment, whether it is for a birthday wish or a daily check-in.
This guide will walk you through the various ways to schedule a text message on your iPhone. We will look at the new, straightforward method in iOS 18, and we will also explore how to use the Shortcuts app for those with older iPhones or for more complex scheduling needs. So, you can learn how to send delayed text messages that arrive exactly when you want them to, making your communication a little easier and a lot more reliable. Never forget to send a text again, or so it seems.
Table of Contents
- Why Schedule Texts on Your iPhone?
- Scheduling Texts with iOS 18's Messages App
- Scheduling Texts Using the Shortcuts App
- Common Questions About Scheduling Texts
Why Schedule Texts on Your iPhone?
Scheduling text messages on an iPhone can be incredibly useful for many reasons. For instance, you might want to send wishes at the perfect time, like a happy birthday message that arrives right at midnight. Or, perhaps you need to remind a colleague about a meeting without disturbing them too early in the morning. It helps ensure you never forget an important message, which is quite a relief.
Think about recurring messages, too. You could set up weekly reminders for family chores or a daily message to your spouse about dinner plans. This kind of automation saves you from having to remember to type and send the same message over and over. It truly helps you manage your communication effortlessly, giving you more time for other things. So, it is a tool for convenience, actually.
There are times when you have something to say, but you do not want to say it just yet. Maybe you thought of a great idea for a friend at 2 AM, but you know they would not appreciate a text at that hour. Scheduling it means your text will get to your desired person at the set time, avoiding awkward late-night pings. It is all about sending messages at just the right moment, you know.
Scheduling Texts with iOS 18's Messages App
The arrival of iOS 18 has brought a very welcome change to how we schedule messages. What used to be a bit of a workaround, often involving the Shortcuts app, is now a direct feature within the Messages app itself. This makes the process much more straightforward for most people, allowing you to send a message at a specific time in the future with just a few taps. It is, in a way, a much-needed addition.
Making Sure Your iPhone is Ready
Before we begin, it is a good idea to make sure your iPhone is completely up to date. The native scheduling feature is part of iOS 18 or later. To check your iOS version, go to your iPhone's "Settings" app, then tap on "General," and finally, select "Software Update." If an update is available, it is probably a good idea to install it to get this new feature. This step ensures we are on the same page, basically.
Step-by-Step: Scheduling a Message in iOS 18
Once your iPhone is running iOS 18 or a newer version, scheduling a message is quite simple. Here is how you do it, you know:
Open the Messages App: Find and tap the green Messages app icon on your home screen. This is where you usually send and receive all your texts.
Start or Open a Conversation: You can either begin a brand-new conversation with someone or open an existing chat thread. Just tap on the contact's name or the message bubble to get started, or to be honest, tap the new message icon.
Tap the Plus (+) Button: In the message input area, to the left of where you type, you will see a small plus (+) button. Give that a tap. This button opens up a menu of different things you can add to your message, like photos or stickers, and now, scheduling options. It is really quite convenient.
Select "Send Later": From the menu that pops up, you will find an option called "Send Later." Tap on this. This is the key step that lets you pick a future delivery time for your message. It is a new addition, obviously.
Choose Your Desired Date and Time: A calendar and time picker will appear. You can scroll through the dates to pick the day you want your message to go out, and then adjust the time down to the minute. You can also select from suggested times, which is pretty handy. This allows you to set specific times for your messages.
Type Your Message: After setting the time, the message input box will reappear. Type out the message you want to send. Make sure it says exactly what you want it to say, because, well, it is going to be sent automatically. You can type anything here, of course.
Tap Send: Once your message is ready and the time is set, tap the blue send arrow. Instead of sending immediately, your message will now show a small clock icon next to it in the conversation thread, indicating it is scheduled for later. It is a bit different from how messages usually appear.
That is it! Your message is now waiting to be sent at the chosen time. It is a much more direct way to send delayed text messages, and it is built right into the app you already use every day. You will probably find this quite useful, you know.
Managing Your Scheduled Messages in iOS 18
Life changes, and so do plans. You might need to adjust a message you have scheduled, or even cancel it entirely. Luckily, iOS 18 gives you easy ways to manage these pending messages. You can reschedule, edit, or delete a scheduled message before it is delivered, which is pretty great.
To Edit or Reschedule: Find the scheduled message in your conversation thread. It will have that little clock icon next to it. Tap on the message bubble itself. A menu will appear with options to "Edit," "Reschedule," or "Delete." If you choose "Edit," you can change the text. If you choose "Reschedule," you can pick a new date and time. It is actually very flexible.
To Delete: If you no longer want the message to be sent, simply tap on the message bubble and select "Delete" from the options. The message will disappear from your conversation thread, and it will not be sent. This helps you keep things tidy, sort of.
To Copy: You can also copy your scheduled messages before they are sent. This is useful if you want to reuse the text for another message or in another app. Just tap the message and look for the "Copy" option. It is a handy little feature, too.
This flexibility means you are always in control of your communication, even when it is set for the future. It really helps you manage your messages effortlessly.
Scheduling Texts Using the Shortcuts App
Before iOS 18, the Shortcuts app was the primary way to schedule texts on an iPhone. Shortcuts is an incredible app native to iOS devices that allows you to automate various tasks on your iPhone, including scheduling text messages. While the Messages app now has its own native scheduling, the Shortcuts app still offers powerful options, especially for older iPhones or for creating more complex, recurring automations. It is, in some respects, still a very capable tool.
When the Shortcuts App is a Good Fit
You might still want to use the Shortcuts app for scheduling messages in a few situations:
Older iOS Versions: If your iPhone is running an iOS version older than 18, the native Messages app scheduling will not be available. In this case, Shortcuts is your best bet. So, it is a good fallback, you know.
SMS Messages to Android Phones: While the iOS 18 feature works well for iMessage, for SMS messages to Android phones, Shortcuts can sometimes offer more consistent results, depending on your carrier and settings. It is worth keeping in mind, apparently.
Recurring Messages: Shortcuts excels at setting up automations that repeat daily, weekly, or monthly. If you need to send weekly reminders of chores to your family or a daily "good morning" text, Shortcuts can automate this with ease. This is where it really shines, actually.
More Complex Automations: Shortcuts allows you to combine message sending with other actions, like turning on a light, playing music, or checking a calendar event. If your scheduled message is part of a larger automated routine, Shortcuts is the tool for the job. It is quite versatile, you know.
Understanding how to use Shortcuts for this purpose means you will never forget to send a reminder, or message somebody at a bad time, regardless of your iOS version. It gives you a lot of control, basically.
Step-by-Step: Setting Up a Scheduled Message with Shortcuts
Setting up a scheduled message using the Shortcuts app involves creating a "Personal Automation." This tells your iPhone to perform an action (like sending a message) when a specific event happens (like a certain time of day). Here is how you can do it:
Open the Shortcuts App: Find the Shortcuts app on your iPhone. It has a blue icon with two overlapping squares. Tap to open it. It is usually pre-installed, you know.
Go to the "Automation" Window: At the bottom of the Shortcuts app, you will see three tabs: "My Shortcuts," "Automation," and "Gallery." Tap on "Automation." This is where you create rules for your iPhone to follow automatically. It is a bit like setting up a smart home system.
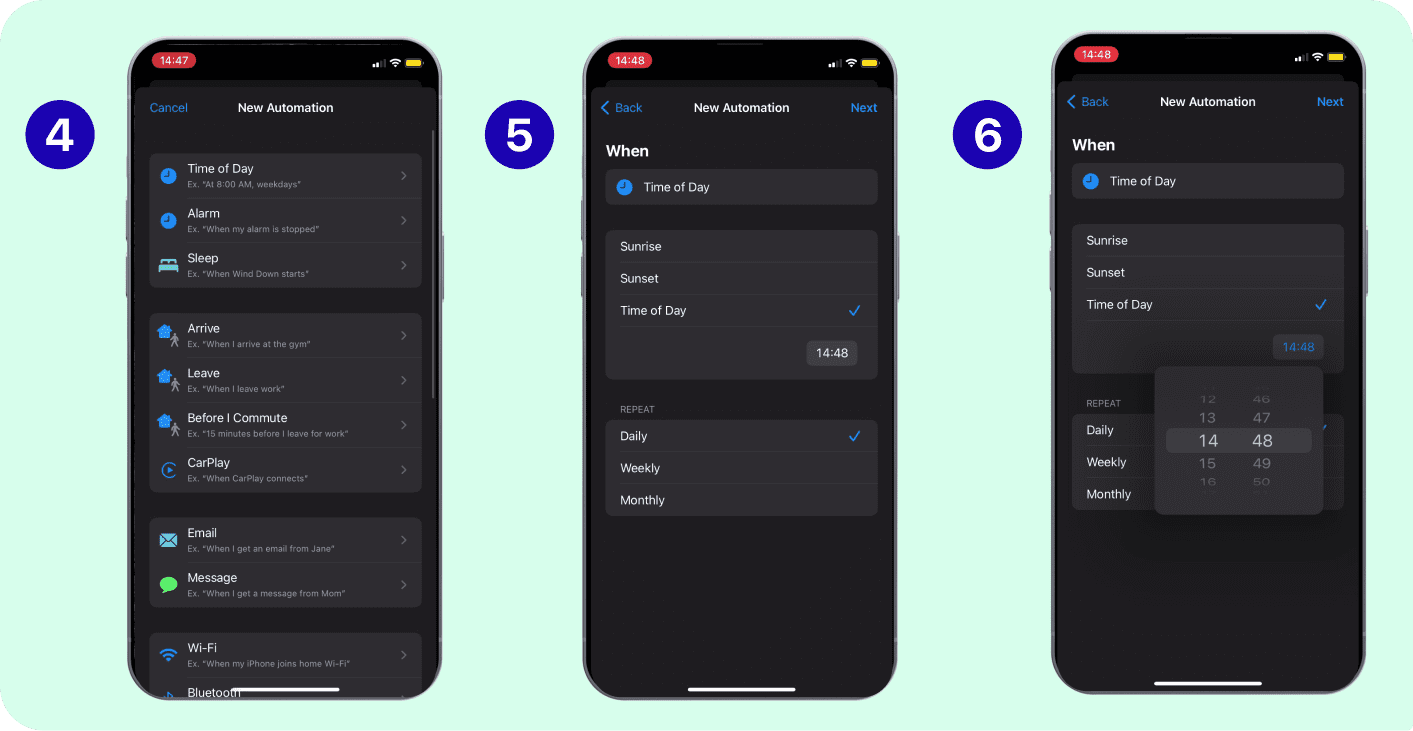
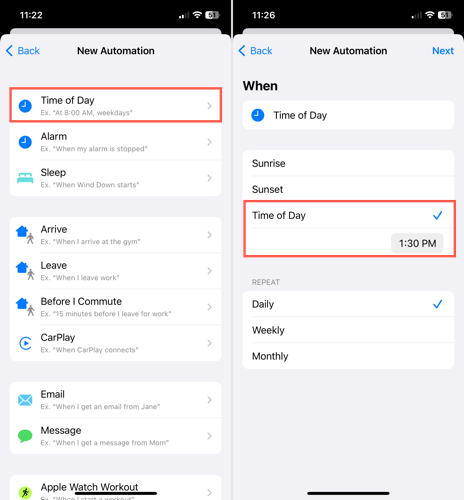
Create Personal Automation: Tap the plus (+) button in the top right corner (or "New Automation" if it is your first time). Then, select "Create Personal Automation." This tells the app you want to set up something just for your device. This step is important, obviously.
Choose Your Event Type (Time of Day): You will see a list of event types that can trigger your automation. For scheduling a text, you will typically choose "Time of Day." Tap on it. You can then specify a precise time, and choose if you want it to repeat "Daily," "Weekly," or "Monthly." This is where you set when your message will go out, you know.
Click "Next": After setting your desired time and repetition, tap "Next" in the top right corner. This moves you to the next step, where you choose what action your iPhone will perform. It is pretty straightforward, actually.
Select "Send Message" Action: Now you need to add an action. Tap "Add Action." In the search bar at the top, type "Send Message" and select it from the results. You can also explore their various convenient actions by clicking the plus (+) button and looking through the "All Actions" section. This is where you tell your iPhone to send a text, sort of.
Configure the Message:
Recipient: Tap on the "Recipient" placeholder. You can select one or more contacts from your address book. You can also type in a phone number directly. This is who your message will go to, obviously.
Message Content: Tap on the "Message" placeholder. Type the exact text you want to send. This is the body of your scheduled text. Make sure it is exactly what you want, you know.
Click "Next": Once you have configured the message and recipient, tap "Next." You are almost done. This step takes you to a summary screen, basically.
Review and Turn Off "Ask Before Running": On the final screen, review your automation details. You will see a toggle labeled "Ask Before Running." For a truly automated scheduled text, you will want to turn this off. If you leave it on, your iPhone will ask for your permission before sending the message, which defeats the purpose of scheduling. A warning might appear, but just confirm you do not want to be asked. This makes it truly hands-free, apparently.
Tap "Done": Finally, tap "Done" in the top right corner to save your automation. Now, at your chosen time, a message will be sent to the recipient. It is a pretty neat trick, really.
This method, while a few more steps than the iOS 18 native option, gives you incredible power to automate your communication. You can even create multiple automations for different messages and times. It is a very flexible system, you know.
Managing Your Shortcuts Automations
Just like with native scheduled messages, you can manage your automations in the Shortcuts app. This includes editing, disabling, or deleting them.
To Edit: Go back to the "Automation" tab in the Shortcuts app. Tap on the automation you want to change. You can then adjust the time, the message content, or the recipients. This is useful if your plans change, or to be honest, if you just want to tweak the message.
To Disable: If you want to temporarily stop an automation from running without deleting it, tap on the automation in the "Automation" tab, and then toggle off the "Enable This Automation" switch. This is handy for seasonal messages, for example.
To Delete: To remove an automation completely, go to the "Automation" tab, find the automation, and swipe left on it. A "Delete" button will appear. Tap it to confirm. This cleans up your list, sort of.
Having these management options means you are always in control of your automated messages, giving you peace of mind. It is a very robust system, too.
Common Questions About Scheduling Texts
People often have a few questions about scheduling texts on their iPhones. Here are some common ones, you know:
Can I schedule a text message to send to someone who does not have an iPhone?
Yes, you can. The native iOS 18 "Send Later" feature in the Messages app works for both iMessage (blue bubbles) and regular SMS messages (green bubbles), so it will send to Android phones or older non-iPhone devices. If you are using the Shortcuts app, it also handles both iMessage and SMS. So, you are pretty much covered, actually.
What happens if my iPhone is off or has no signal when a scheduled message is supposed to send?
If your iPhone is off or has no cellular or Wi-Fi signal at the exact scheduled time, the message will not send immediately. For the native iOS 18 feature, the message will typically attempt to send once your phone regains a connection. For Shortcuts automations, the message will generally send once the conditions are met (i.e., the time arrives) and your phone has a connection. It is important to have a connection for it to work, obviously.
Can I schedule recurring text messages on my iPhone?
Yes, you can schedule recurring text messages, and this is where the Shortcuts app really shines. When you set up a Personal Automation based on "Time of Day" in Shortcuts, you can choose for it to repeat "Daily," "Weekly," or "Monthly." This is ideal for things like weekly reminders or monthly check-ins. The native iOS 18 Messages app feature is more for one-time future sends, though you could manually schedule multiple individual messages. So, Shortcuts is better for recurring stuff, pretty much.
Knowing how to schedule a text on your iPhone, whether you use the new iOS 18 feature or the powerful Shortcuts app, means you will never forget to send a reminder (or message somebody at a bad time). It is a simple way to make your daily communication flow a little smoother. You can learn more about how to schedule texts on our site, and you might also want to explore other messaging tips we have. So, give it a try!

How to Schedule Text Messages on iPhone and iPad Using Shortcuts App
How you can schedule a text on iPhone natively with Shortcuts
How to Easily Schedule Text Messages on iPhone

