How To Do A Messy Bun: Your Guide To Effortless Hair Charm
There's something truly special about a messy bun, isn't there? It’s that wonderful hairstyle that makes you feel comfortable and glamorous all at once, you know? Whether you’re staying in for a quiet evening, heading out for a fun time, or just need to tame a hair day that's gone a bit wild (we've all been there, right?), this look has you covered. It's a style that always seems to work, pretty much.
For ages, tousled hair with a bit of a natural feel has been a beauty aspiration, and the messy bun, it's almost like the ultimate expression of that. It’s a look many people love, and for good reason. This style can be your go-to, a really quick fix that still looks amazing. So, learning how to do a messy bun is a pretty handy skill to have, actually.
Many folks wonder how to do a messy bun that looks just right, especially if they have thin hair and want volume, or long, thick hair that seems hard to manage. Well, good news! We’re going to walk you through a step-by-step guide with insights that come straight from pro hairstylists. We’ll cover easy ways to get this look, some neat tricks, and even the products that help give your hair texture, volume, and hold. It doesn't get any simpler than this, really!
Table of Contents
- The Timeless Appeal of the Messy Bun
- Getting Ready: Your Messy Bun Essentials
- How to Do a Messy Bun: The Classic Way
- Messy Bun Hacks for Every Hair Type
- Exploring Messy Bun Variations
- Pro Tips for Your Best Messy Bun
The Timeless Appeal of the Messy Bun
Messy hair with a relaxed feel has been a popular beauty look for what feels like ages. It just has that certain charm, doesn't it? The messy bun, in particular, captures this perfectly. It’s a style that feels both put-together and wonderfully casual, which is why it's a favorite for so many people. You can wear it almost anywhere, you know, and it always looks good.
This undone updo is really quite versatile. It’s great for a relaxed day at home, a quick trip to the store, or even for something a bit more dressed up. The fact that it can go from a 'just rolled out of bed' vibe to a chic evening look with just a few tweaks is part of its lasting appeal. It’s a staple style, really, and one that pretty much everyone can try.
What makes the messy bun so special is its effortless structure. It should look like you just threw it together, but with a bit of thought behind it. This guide helps you get that just-right look, whether you’re aiming for a quick, one-minute messy bun or something with more volume. We've got easy messy buns for long hair or short hair, too, so everyone can find a way to make it work.
Getting Ready: Your Messy Bun Essentials
Before you start creating your messy bun, having the right tools and products makes a big difference, honestly. You don't need a lot of things, just a few key items can help you achieve that perfect look. It’s about picking the right helpers for your hair type, you see.
Hair Ties and Bands
The most important tool for any messy bun is a good hair tie. You really need one that's stretchy and holds well without pulling your hair too much. For example, some people really like the brand Gimme Beauty because they offer hair ties for different hair types. This means you can find one that's just right for your hair's thickness and texture, which is pretty helpful.
Having the right hair tie prevents your bun from slipping down or feeling too tight. A good quality tie will give your bun the support it needs to stay put, but still let you create that relaxed, messy look. It’s a small thing, but it makes a big difference, you know?
Texture and Volume Boosters
To get that lovely, tousled look with movement and volume, you might want to use a few products. These aren't always necessary, but they can really help, especially if your hair is naturally very fine or a bit slick. Products that add texture can give your hair more grip, making it easier to shape into a bun.
A dry shampoo or a texturizing spray can work wonders for this. They add a bit of grit to your hair, which helps the bun hold its shape and gives it that full, voluminous appearance. For instance, if you're struggling to create a voluminous messy bun with thin hair, a good texturizing product can be your best friend. It’s a simple addition that can really change the game, so.
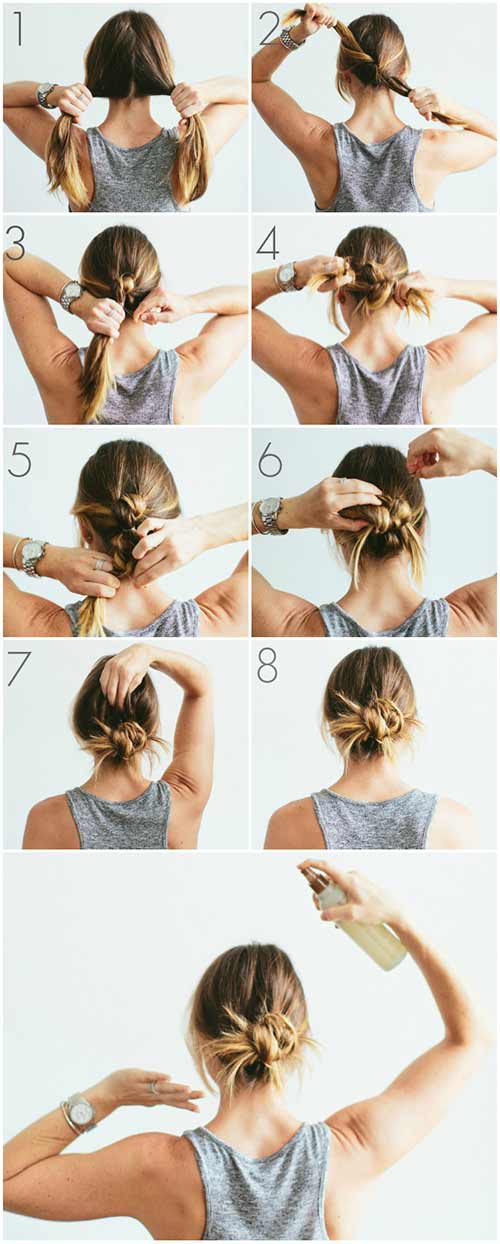
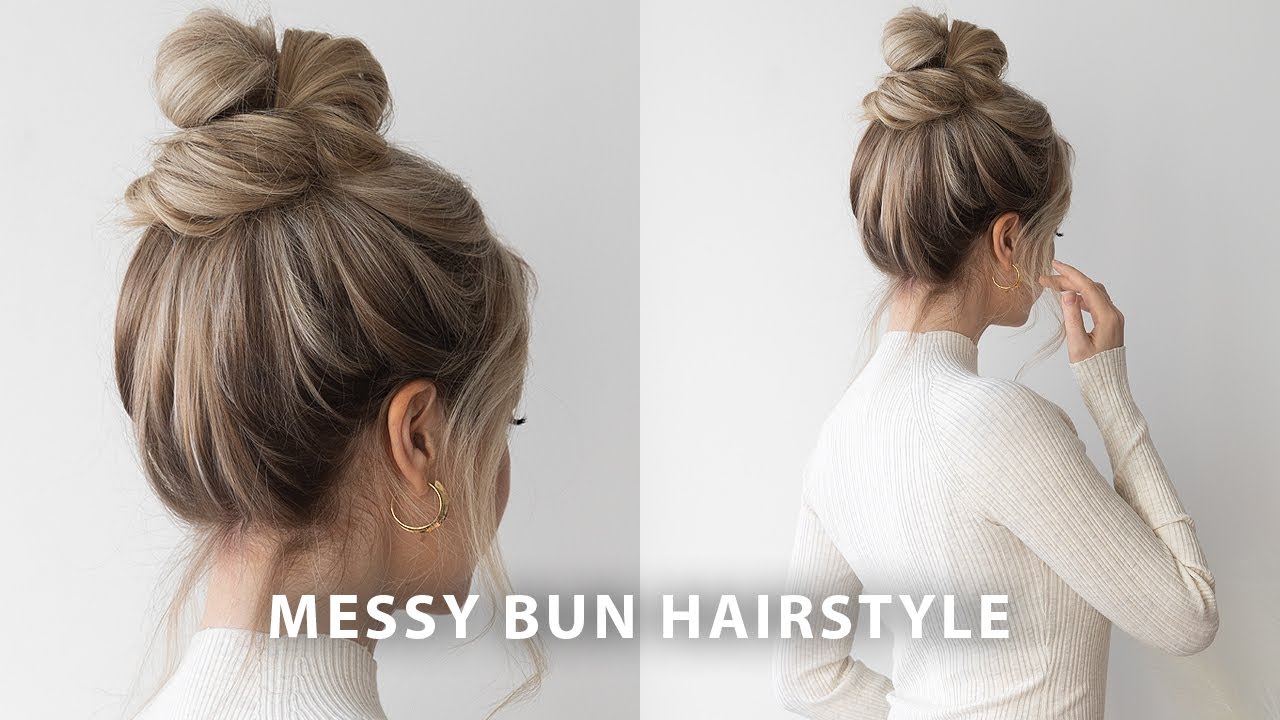
How to Do a Messy Bun: The Classic Way
This is a super easy, staple style that takes just a few products and a little bit of time. It's often called the 60-second messy bun tutorial for a reason! We'll break down each step, so you can see how simple it really is to create this quick messy bun using just a few tools, basically.
Step 1: Prep Your Hair for Texture
Start with hair that has a little bit of natural texture. Day-old hair often works best, as it has more grip than freshly washed, super-clean hair. If your hair is very clean, you might want to spray a little dry shampoo or texturizing spray through it. This helps add some body and makes the hair less slippery, you know?
Work the product through your hair with your fingers, giving it a gentle shake at the roots. This step is about building a foundation for your bun, making sure it has something to hold onto. It’s a quick way to get your hair ready for the next steps, really.
Step 2: The High Ponytail Base
Gather all your hair into a ponytail at the crown of your head, or wherever you want your bun to sit. This is a common technique for creating a great messy bun, and it gives you a good starting point. Don't worry about it being perfectly smooth; remember, we're aiming for 'messy' here, so a few stray pieces are totally fine, actually.
Hold the ponytail with one hand. The height of your ponytail will determine where your bun ends up. For a classic, high messy bun, aim for the top of your head. For a more relaxed feel, a lower ponytail works, too.
Step 3: Twisting and Wrapping
Now, take your ponytail and twist it gently. You don't want to twist it too tightly, just enough to create some shape. Then, begin to wrap this twisted section around the base of your ponytail. It’s about creating a loose coil, in a way.
As you wrap, let some pieces fall out a bit. This is part of what gives the bun its "messy" character. You're aiming for something that looks a bit undone, yet still holds together. This step is where the 'art' of the messy bun really comes into play, you know?
Step 4: Securing the Bun
Once you’ve wrapped your hair into a bun shape, it’s time to secure it. Take your stretchy hair tie and wrap it around the bun to hold it in place. For a really secure hold, you might wrap it twice or even three times, depending on your hair's thickness. This is where those hair ties for different hair types really shine, by the way.
If you have very long or thick hair, or if you want extra security, you can use a few bobby pins to tuck in any loose ends or reinforce parts of the bun. Pins can help create that 'effortless structure' that pro hairstylists talk about. They just help keep everything where it should be, more or less.
Step 5: Pulling for Perfection
This is arguably the most important step for achieving that perfectly tousled, still gorgeous look. Gently pull on sections of your bun and around your hairline. You want to loosen things up a bit, creating volume and a more relaxed feel. Pull out a few face-framing pieces if you like that look. It makes the style feel softer, you see.
Pulling gently on the top of your head can add volume there, too. This step is all about making the bun look less 'perfect' and more 'effortless.' It's about giving it movement and a bit of a lived-in feel, which is really what the messy bun is all about. This is where you personalize it, basically.
Messy Bun Hacks for Every Hair Type
The beauty of the messy bun is that it works for pretty much any hair type and length. You just need to know a few tricks. We've got easy messy buns for long hair or short hair, so don't think your hair won't work for this style. It's all about adapting the technique a little bit, you know?
For Long Hair and Thick Hair
If you have long, thick hair, putting it in a bun can sometimes feel like a struggle. One great technique for creating the perfect messy bun is to start with a ponytail and then use pins to create the bun. Instead of just wrapping it once, you might twist your ponytail into two or three sections before coiling them around each other. This helps manage the volume, you see.
You can also create a loop with your hair tie on the last pass, leaving the ends out, then wrap those ends around the base and pin them. This gives you a really full bun without it feeling too heavy. It's a neat way to control all that hair, actually.
For Thin Hair and Adding Volume
Longing to create a voluminous messy bun with thin hair? It's totally possible! The key here is to build volume before you even start. Use a texturizing spray or dry shampoo generously at your roots and through the lengths of your hair. You can also gently backcomb the hair in your ponytail before you twist it. This creates a lot of body and makes your hair look fuller, you know?
When you twist and wrap, keep it very loose. Don't pull too tightly. The looser you are, the more volume your bun will have. After securing it, pull out more small sections from the bun itself and around your crown to give the illusion of more hair. It's about creating that airy, full look, so.
For Short Hair
Yes, you can absolutely do a messy bun with short hair! It might be more of a mini-bun or a half-up style, but the principles are the same. Gather as much hair as you can into a high ponytail. If your hair is too short to wrap fully, you can just loop it through the hair tie once or twice, leaving the ends sticking out. This creates a cute, spiky messy bun, you see.
Use plenty of bobby pins to secure any shorter pieces that might fall out. A little bit of hairspray can also help keep those shorter layers in place. It's a quick way to get your hair off your neck and still look stylish, basically.
Exploring Messy Bun Variations
The classic messy bun is wonderful, but there are so many ways to play with this style! We've asked the experts how to create every type of messy bun, from braided to a classic look, as well as the tools you'll need to put them together. It's about finding what works best for you and your mood, you know?
The Low Messy Bun
The easiest low messy bun is just as simple as its high counterpart, but it gives a different vibe. Instead of gathering your hair at the crown, pull it back to the nape of your neck, like you're making a low ponytail. Then, follow the same twisting and wrapping steps. This look is often seen as more elegant or relaxed, and it’s perfect for a casual day or even a more formal event. It’s a very chic option, really.
You can also let a few pieces fall around your ears for a softer frame. This low bun is great for those looking for quick, easy styles that still have a polished feel. It's a simple change that makes a big difference, apparently.
The Braided Messy Bun
For a messy bun with a bit more detail, try adding a braid. You can create a regular ponytail, then braid the ponytail before you twist it into a bun. This adds texture and a lovely pattern to your messy bun. It's a subtle touch that elevates the whole look, you know?
Another way is to leave a section of hair out before you make your bun, then braid that section and wrap it around the finished bun. This creates a really interesting detail. It’s a fun way to experiment with the style and make it uniquely yours, so.
Pro Tips for Your Best Messy Bun
To really nail this undone updo, here are some extra tricks from the pros. These little things can make a big difference in how your messy bun turns out. They help ensure your bun has movement and volume, and stays put, you know?
First, don't aim for perfection. The whole point of a messy bun is that it looks a bit effortless. So, if a few strands escape, that's part of its charm. Trying too hard to make it perfect often makes it look stiff, which is not what we want, really.
Second, consider using a hairspray with a flexible hold once your bun is done. This helps keep everything in place without making your hair feel crunchy. It's about giving it a gentle hold, allowing for natural movement, too. This can be especially helpful if you have layers that tend to fall out.
Third, for extra volume, try flipping your head upside down when you gather your hair into a ponytail. This lifts the hair at the roots and gives your bun a fuller base. It’s a simple trick that adds a lot of body, apparently.
Fourth, if your hair is very clean and soft, a little dry shampoo can add texture and grip, making it easier to create the bun. This product is a real lifesaver for making hair more manageable, you know. It helps the hair hold its shape better.
Fifth, don't be afraid to experiment with different placements. A high bun gives a playful, energetic look, while a low messy bun feels more relaxed and sophisticated. Try different spots to see what looks best on you. It's all about finding your personal style, basically.
To learn more about hair care on our site, and link to this page for more easy tutorials and hacks for a perfect 'do.
22 Stunningly Easy DIY Messy Buns

Messy Bun Tutorial - Hello Fashion
Messy Hair Bun Tutorial

