Learn To Draw Spongebob: Your Easy Guide To Fun Art
Learning to draw Spongebob Squarepants is, you know, a really fun way to explore your creative side. This character, with all his goofy details, is quite recognizable and versatile, making him a great subject for anyone picking up a pencil. So, whether you are just starting out with art or you are looking for a simple, enjoyable project, drawing our favorite sea sponge can be a very rewarding experience, actually.
For a long time, people have loved Spongebob, and that, too, means he is a fantastic choice for a drawing lesson. He is a character that can, in a way, help communicate a wide range of messages, and his simple shapes make him quite approachable for artists of all skill levels. You will find that kids and beginners alike can now draw a truly great looking Spongebob Squarepants, which is pretty neat, if you ask me.
Today, you are in luck because this guide will show you how to capture Spongebob's cheerful spirit on paper. We are going to, you know, learn basic drawing techniques that combine both fun and a lot of creativity. This simple, fun guide for kids will show anyone how to draw our favorite sea sponge, and it is, you know, designed to be super easy to follow, too.
Table of Contents
- Why Spongebob is a Perfect Drawing Buddy
- Getting Your Art Stuff Ready
- Your 9 Easy Steps to Spongebob Drawing Success
- Step 1: The Basic Body Shape
- Step 2: Adding the Eyes and Mouth
- Step 3: Drawing the Nose and Cheeks
- Step 4: Creating the Arms and Legs
- Step 5: Sketching the Shirt and Tie
- Step 6: Getting the Pants Just Right
- Step 7: Adding the Shoes and Socks
- Step 8: The Final Details and Outlines
- Step 9: Making It Pop with Color
- Helpful Hints for Your Spongebob Art
- Frequently Asked Questions About Spongebob Drawing
Why Spongebob is a Perfect Drawing Buddy
Spongebob, as a character, is really a fantastic choice for anyone wanting to get into drawing, you know. His design is simple enough for those just starting out, yet it has enough personality to make the drawing process feel very engaging. It is, in a way, a chance to learn how simple shapes can come together to form something truly expressive, which is pretty cool.
You will find that learning how to draw Spongebob with all his goofy details is, you know, a very satisfying experience. This simple lesson, as a matter of fact, consists of nine steps, which makes it very manageable for anyone to follow along. It is, basically, another free cartoons for beginners step by step drawing video tutorial type of experience, but in written form, too.
The idea is that this step by step tutorial will have you drawing in no time, which is, you know, what we all want. With the help of this lesson, you will be able to learn how easy it is to draw a Spongebob, and that, you know, feels pretty good. It is perfect for kids, beginners, and all fans, actually, so everyone can join in the fun.
Getting Your Art Stuff Ready
Before you begin your Spongebob drawing adventure, it is a good idea to gather your art supplies, you know. The good news is that you do not need anything super fancy or expensive to get started. We have a list of the supplies we used, but feel free to use whatever you have in your home or classroom, which is, you know, pretty flexible.
What You Might Need
First off, you will need something to draw with, you know. A Sharpie is a good choice for bold lines, or you could use a regular pencil if you prefer to sketch lightly first. Any kind of pen or marker you have on hand will work, too. The main thing is that it lets you put marks on paper, which is, you know, pretty essential for drawing.
Next up, you will definitely need some paper, as a matter of fact. We often use marker paper because it helps the colors look vibrant, but any kind of paper will do, really. Notebook paper, printer paper, or even a piece of cardboard can work just fine. The goal is to have a surface where your Spongebob can come to life, and that, you know, can be pretty much anything.
If you want to add color to your Spongebob drawing later, you will want some coloring tools, you know. Crayons, colored pencils, or markers are all great options. Again, use whatever you have available. The most important thing is to have fun with it, and that, you know, is what drawing Spongebob is all about, actually.
Your 9 Easy Steps to Spongebob Drawing Success
Are you ready to learn how to draw Spongebob? This step by step tutorial will have you drawing in no time, you know. This simple lesson consists of nine steps, making it very straightforward. Follow along with us and learn how to draw Spongebob Squarepants, and you will see just how easy it is, actually.
Someone once mentioned that some previous Spongebob drawing tutorials were a bit too hard for them, so we tried to make an easier Spongebob tutorial this time, you know. We hope we succeeded, but at least we tried, which is, you know, what counts. Please let us know if this is easier for you to draw, too!
Step 1: The Basic Body Shape
To start your Spongebob drawing, you will want to create the main shape of his body, you know. Think of it as a slightly irregular rectangle, or maybe a bit like a sponge, which is, you know, what he is. It does not have to be perfectly straight, as Spongebob is, in a way, a bit wobbly and fun, so do not worry too much about perfection here, actually.
You might want to sketch this part lightly at first, especially if you are using a pencil, you know. This initial shape will be the foundation for everything else you add. It is, basically, the first big step in getting your Spongebob Squarepants drawing started, and that, you know, feels pretty good.
Remember, this is about learning how to draw a simple and cute Spongebob for kids, so the first step should feel very manageable. Just get that basic sponge shape down on your paper, and you are, in a way, already off to a great start, too. It is, basically, the outline of his main body, nothing too complicated, really.
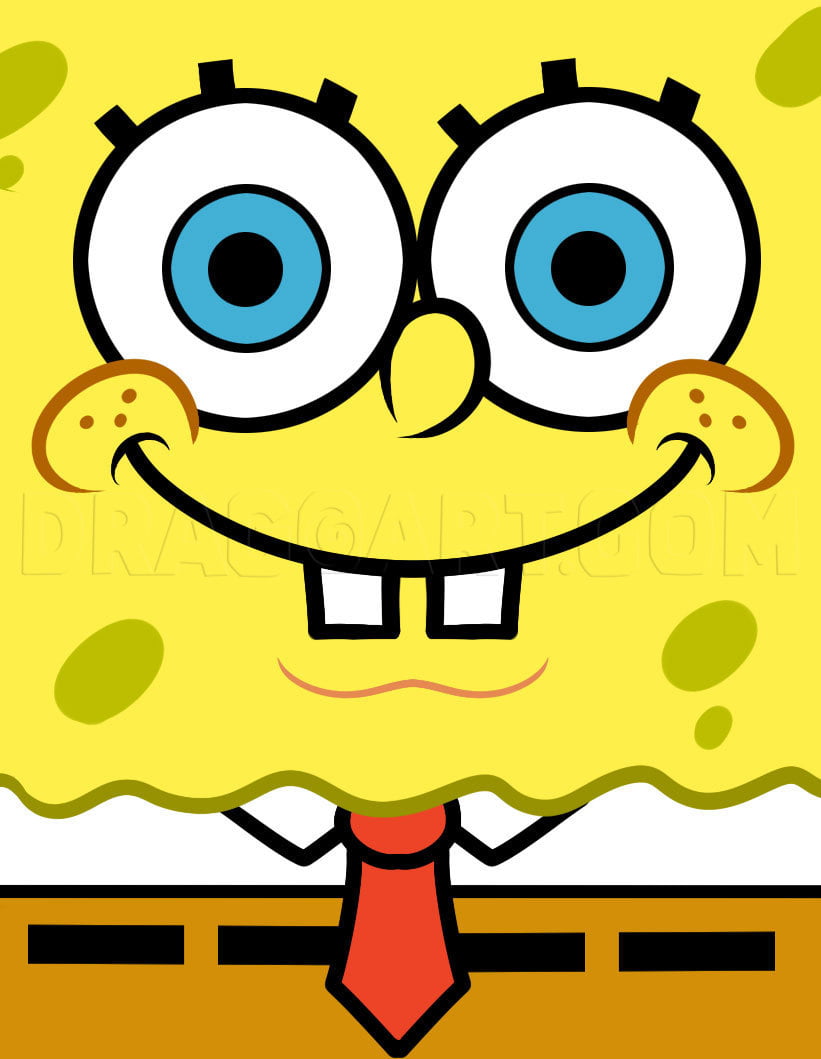
Step 2: Adding the Eyes and Mouth
Now that you have the body shape, it is time to give Spongebob some personality, you know, by adding his big, round eyes. Place them fairly high up on his body, and make them quite large. He has, basically, these really distinctive eyes that are a big part of his character, so make sure they stand out, actually.
After the eyes, you will want to draw his wide, happy mouth, you know. Spongebob is almost always smiling, so make sure his mouth reflects that cheerful disposition. You can, in a way, give it a bit of a curve to show his excitement, which is pretty typical for him.
This step is where Spongebob really starts to look like himself, you know. The eyes and mouth are very expressive features. So, take your time with these parts, and try to capture that joyful look he always has, which is, you know, pretty central to his appeal.
Step 3: Drawing the Nose and Cheeks
Following the eyes and mouth, you will want to add Spongebob's rather prominent nose, you know. It is, basically, a simple, somewhat long shape that extends from the middle of his face. It does not have to be perfectly straight, as Spongebob's features are, in a way, often a bit quirky, so just get the general idea down, too.
Then, you can add his little cheek marks, you know, usually two or three small dots on each cheek. These add a bit of texture and, in a way, emphasize his happy, bubbly nature. They are small details, but they really help to complete his face, which is, you know, pretty important.
This step really helps to fill out Spongebob's face and give him that familiar look, actually. It is about adding those smaller, yet very recognizable, facial elements that make him so unique. So, just a few simple lines and dots here, and you are, basically, getting closer to a finished Spongebob.
Step 4: Creating the Arms and Legs
Next up, it is time to give Spongebob his arms and legs, you know. His arms usually stick out from the sides of his body, and they are, in a way, quite thin. You can draw them reaching out or pointing in a direction that shows some action, which is pretty common for him.
For his hands, remember his four fingers, you know. They are fairly simple shapes, almost like little sausages. Just make sure to give him enough fingers, and you will be good to go. It is, basically, about getting the right number of digits, and that, you know, is pretty straightforward.
His legs are also quite thin, extending downwards from his pants, you know. They are, in a way, just simple lines that lead down to where his shoes will be. Do not worry about making them too detailed at this stage; just get their general placement and length right, and you are, you know, doing fine, actually.
Step 5: Sketching the Shirt and Tie
Now, let us add Spongebob's iconic outfit, you know, starting with his shirt and tie. His shirt is a simple white shape, usually with a collar that peeks out just below his head. It is, basically, a straightforward addition that helps define his upper body, which is pretty easy to do.
Then, you will want to draw his small, red tie, you know. It is usually a very simple, triangular shape that sits right in the middle of his shirt collar. This little detail is, in a way, very characteristic of Spongebob's formal yet goofy look, so make sure to include it, too.
This step is all about getting those key clothing elements in place, you know. They are, basically, very simple shapes, but they add a lot to his overall appearance. So, just a few lines for the collar and a small triangle for the tie, and you are, you know, making great progress, actually.
Step 6: Getting the Pants Just Right
After his shirt and tie, you will need to draw Spongebob's famous square pants, you know. These are, basically, what give him his name, so they are pretty important. They should be a clear, somewhat blocky shape that covers the lower half of his body, and that, you know, is pretty easy to get right.
You can add a simple belt line across the top of his pants, you know, to separate them from his shirt. This helps to define the different parts of his outfit. It is, in a way, a small detail that makes a big difference in how his clothes look, which is, you know, pretty helpful.
Remember, the pants are, basically, what make him "Squarepants," so make sure they have that distinct, somewhat rigid shape. This step really helps to anchor his lower body and prepare for the shoes, actually. So, just a simple square shape, and you are, you know, doing great.
Step 7: Adding the Shoes and Socks
Next, let us put some shoes on Spongebob, you know. His shoes are, basically, fairly simple, somewhat rounded shapes at the bottom of his legs. They are usually black and have a bit of a curve to them, which gives them a classic cartoon look, actually.
Before the shoes, you will want to add his socks, you know. Spongebob's socks are, in a way, white and often have a red and blue stripe pattern near the top. You can draw these as simple cylinders extending from his pants down to his shoes, and that, you know, is pretty straightforward.
This step really finishes off his lower half and gets him ready for action, you know. The shoes and socks are, basically, those little touches that complete his familiar look. So, just get those simple shapes down, and you are, you know, almost there, actually.
Step 8: The Final Details and Outlines
Now that you have all the main parts of Spongebob drawn, it is time to add those important final details, you know. This includes the little holes on his sponge body, which are, in a way, randomly placed circles of different sizes. These really make him look like a sea sponge, so add a good number of them, actually.
You can also go over your lines with a darker pen or marker, like a Sharpie, you know, to make your Spongebob drawing stand out. This is where you can refine any wobbly lines and make everything look neat and clean. It is, basically, the step where your sketch becomes a finished line drawing, and that, you know, feels pretty good.
This stage is, basically, about bringing all the elements together and making them pop, you know. It is where you give your Spongebob drawing that polished, cartoonish finish. So, take your time with these final touches, and you will have a truly great looking Spongebob, too.
Step 9: Making It Pop with Color
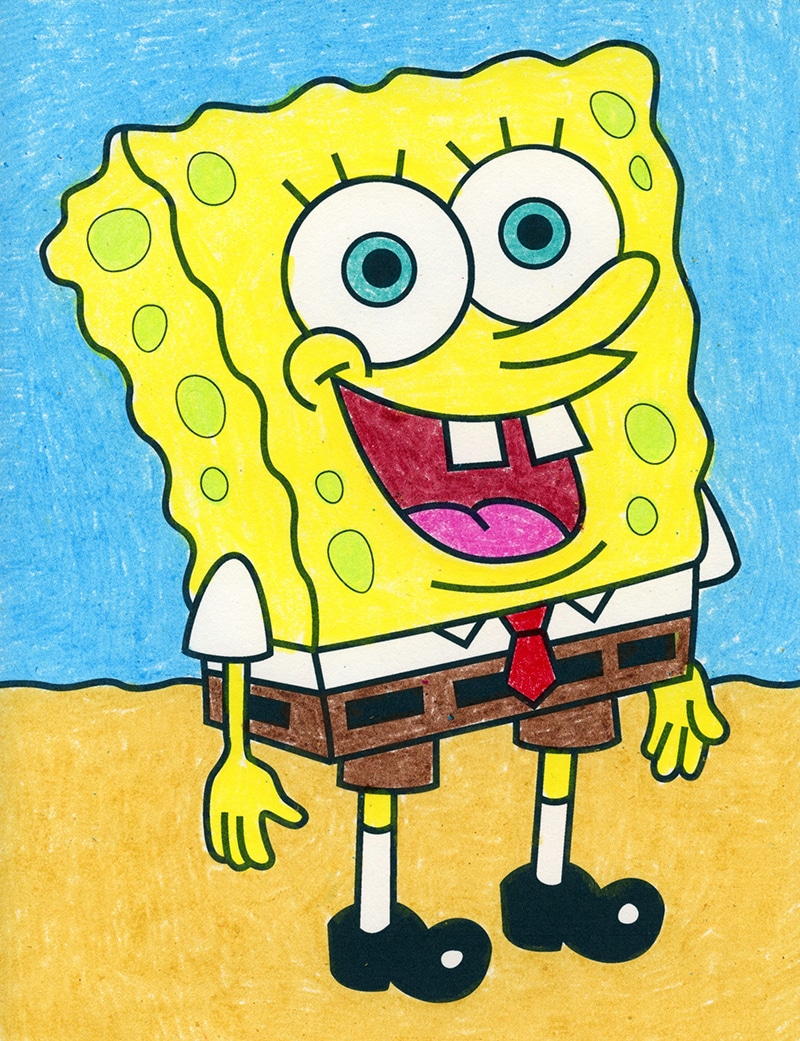
The last step in your Spongebob drawing journey is to add color, you know. This is where your Spongebob truly comes to life! He is, basically, bright yellow for his body, with white for his shirt and socks, and brown for his pants. His shoes are black, and his tie is red, actually.
You can use crayons, colored pencils, or markers for this part, you know. Just pick your favorite coloring tools and fill in the different sections. Do not be afraid to be bold with your colors, as Spongebob is, in a way, a very vibrant character, so make him shine, too.
Adding color is a very fun and creative part of the process, you know. It is, basically, the final touch that makes your Spongebob drawing complete and ready to show off. So, enjoy this last step, and watch your drawing truly pop, actually!
Helpful Hints for Your Spongebob Art
If you want to learn how to draw Spongebob, you have, in a way, come to the right place, and these tips can help you even more, you know. Remember that practice makes a big difference. The more you draw, the more comfortable you will become with the shapes and lines, which is, you know, pretty true for any art.
You can also visit the official Spongebob Squarepants website here for more inspiration and to see how the character looks in different poses and expressions, actually. Seeing him in various situations can give you new ideas for your own drawings, which is, you know, a great way to expand your skills.
For more art lessons, you can always look for drawing videos, you know, similar to the ones mentioned with many subscribers. Many artists share their methods, and watching them draw can provide valuable insights. It is, basically, another free cartoons for beginners step by step drawing video tutorial, just waiting for you to watch, too.
Frequently Asked Questions About Spongebob Drawing
Is it hard to draw Spongebob?
Not at all, actually! This simple, fun guide for kids will show anyone how to draw our favorite sea sponge. This step by step tutorial will have you drawing in no time, you know, and it is designed to be very easy, too. We have tried to make this Spongebob tutorial easier, as a matter of fact, so it is quite manageable.
What art supplies do I need to draw Spongebob?
You do not need many things, you know. A Sharpie (or something to draw with) and paper are the main items. We use marker paper, but feel free to use whatever you have in your home or classroom, which is, you know, pretty flexible. You can also add crayons or colored pencils for coloring, actually.
Can beginners really draw Spongebob?
Absolutely, you know! Kids and beginners alike can now draw a great looking Spongebob Squarepants. This lesson shows the sketching and drawing steps from start to finish, making it very approachable for anyone just starting out. It is, basically, perfect for kids, beginners, and all fans, too.
Learn more about drawing fun characters on our site, and find tips on improving your sketching skills.

How to Draw Spongebob Squarepants - Really Easy Drawing Tutorial
Draw SpongeBob SquarePants Tutorial and SpongeBob Coloring Page
How To Draw Spongebob Easy Tutorial, 6 Steps - Toons Mag

